The Complete Aesthetic Gaming Setup Guide for 2026
Everything you need to build a cohesive, Instagram-worthy gaming station — from choosing your colour palette to photographing the final result.
Why aesthetics matter for your gaming setup
Your gaming setup is more than a workstation — it's a personal space you spend hours in every day. A thoughtfully designed desk lifts your mood, reduces visual clutter, and creates an environment where you actually want to sit down and play, work, or create. The aesthetic gaming community has exploded over the past few years, driven by r/battlestations, TikTok desk tours, and the growing crossover between gaming culture and interior design.
The good news: building a beautiful setup doesn't require an unlimited budget. It requires intentionality — choosing a cohesive palette, layering lighting thoughtfully, and selecting peripherals that complement each other rather than clashing.
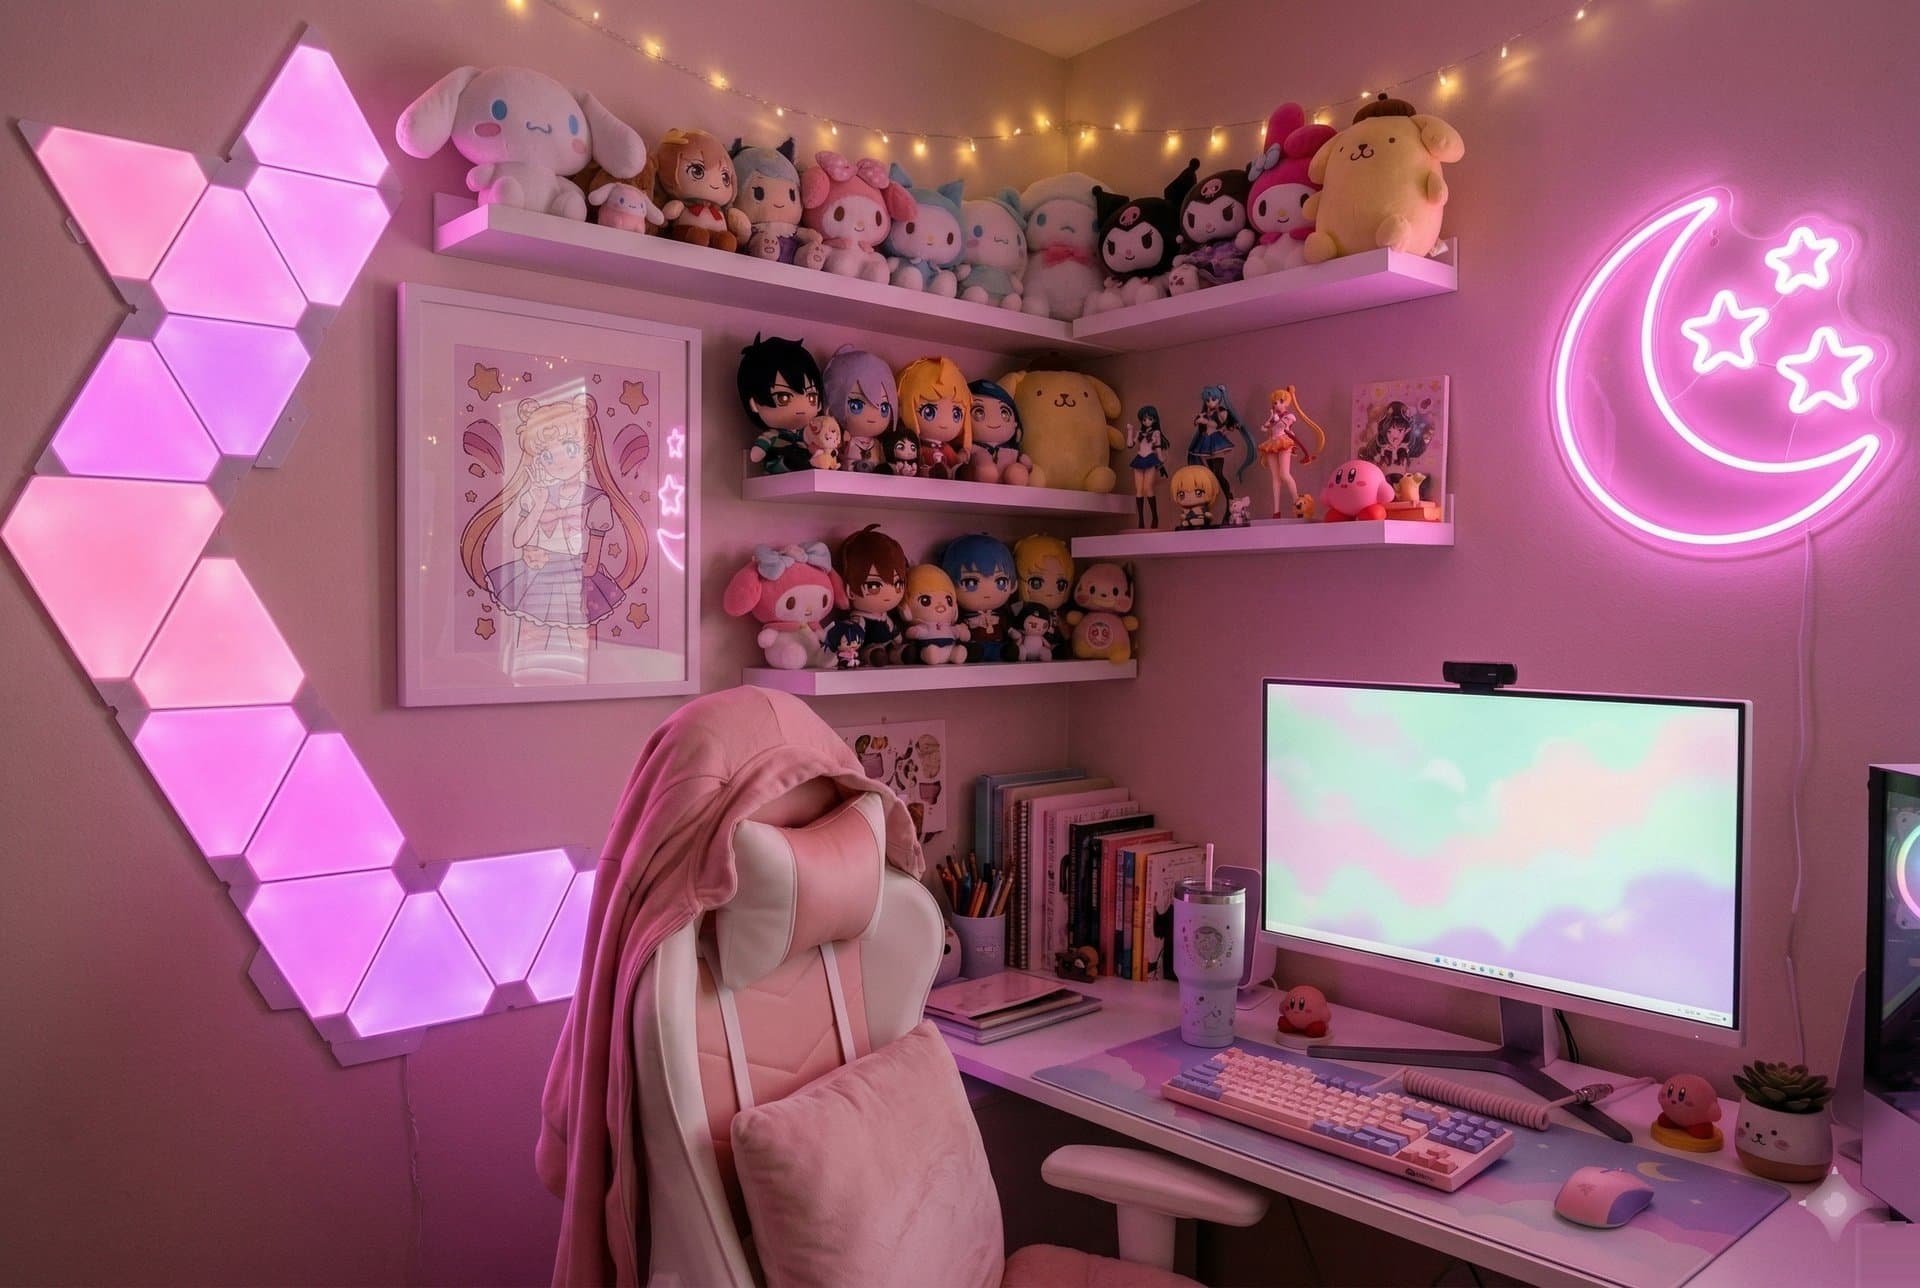
Step 1: Choose your colour palette
Every great setup starts with 2–3 core colours. This is the single most impactful decision you'll make — it determines which keycaps, lighting, desk mat, and accessories will work together.
Popular palettes in 2026:
- Sakura pink + cream + warm white — The classic kawaii look. Soft, inviting, photographs beautifully.
- Lavender + silver + cool white — Modern, clean, slightly futuristic.
- Forest green + walnut + warm amber — The "cottagecore meets gaming" look that's trending hard.
- All-black + single accent colour — Minimalist and striking. Pick one pop of teal, orange, or purple.
Commit to your palette before buying anything. Everything you add to the desk should pass the question: "Does this match my 2–3 colours?"
Step 2: Start with the keyboard
The keyboard is the centrepiece of any aesthetic setup. It's the first thing people notice in photos and the item you interact with most. For aesthetic setups, mechanical keyboards with swappable keycaps give you the most flexibility.
Key decisions:
- Size: 65% and 75% layouts are the sweet spot — compact enough to look clean, large enough to be functional.
- Keycap material: PBT over ABS. PBT resists shine, holds colour, and has a more premium feel.
- Profile: Cherry profile is the most popular for gaming. SA and MT3 profiles have a retro, sculptural look that photographs well.
- Backlit compatibility: If you want RGB to shine through your keycaps, look for pudding-style or translucent legends.
Step 3: Layer your lighting
Lighting makes or breaks the vibe. The goal is 2–3 layers at different heights, all matching your palette:
- Key light: A desk lamp or monitor light bar. Functional, but choose one in a colour that fits.
- Ambient fill: Hex light panels, a neon sign, or an LED strip behind the monitor. This is your "mood" layer.
- Accent: Small touches — a pixel art lantern, underglow strips, or a backlit figure. Adds depth without clutter.
The biggest mistake is cycling rainbow RGB. Pick 2 colours from your palette and set them to static or slow-breathing. Your setup will look ten times more intentional.
Step 4: Desk surface and cable management
A quality desk mat (900mm × 400mm minimum) unifies the look and protects your desk surface. Choose a colour that complements your keycaps — it's the "canvas" everything sits on.
Cable management is the unsexy-but-critical step. A few cable clips, a cable tray under the desk, and a coiled USB cable for the keyboard transform a messy desk into a clean one. Coiled cables in particular are a cheap upgrade that adds a premium, intentional feel.
Step 5: Accessories and personal touches
This is where your setup becomes yours. The peripherals create the foundation; accessories tell the story:
- Wrist rests: Cloud-shaped or leather, they add comfort and visual warmth.
- Plants: A small succulent or faux vine adds life without maintenance.
- Figures or plushies: A single character that means something to you — not a shelf of clutter.
- Headphone stand: Gets headphones off the desk and adds vertical interest.
Step 6: Photograph and share
Once your setup is complete, capture it. The best desk photos use:
- Golden hour or artificial warm light — avoid harsh overhead fluorescents.
- 45-degree angle from the side — shows depth and layering.
- A top-down flat lay — for the full "desk tour" shot.
- Keep the background simple — tidy the area around the desk before shooting.
Frequently asked questions
What do I need for an aesthetic gaming setup?
A cohesive aesthetic gaming setup starts with a colour palette (2–3 colours), matching keycaps, ambient desk lighting (hex panels or light bars), a quality desk mat, cable management, and small personal touches like plants or figures. Budget around $200–500 for peripherals beyond the PC itself.
What are the best keycap materials for aesthetic keyboards?
PBT (polybutylene terephthalate) keycaps are the best choice for aesthetic setups. They resist shine, hold colour longer, have a premium matte texture, and come in more artisan designs than ABS. Double-shot PBT gives the most durable legends.
How do I light my gaming desk without it looking tacky?
Use 2–3 layers of warm-toned lighting at different heights: a key light (desk lamp or light bar), ambient fill (hex panels or LED strip behind the monitor), and accent lighting (small lantern or underglow). Avoid cycling rainbow RGB — pick 2 colours that match your palette and keep them static or slow-breathing.
What desk mat size should I get for a gaming setup?
A 900mm × 400mm (36" × 16") desk mat is the most popular size for gaming setups. It covers the keyboard and mouse area with room to spare. For wider desks, a 1200mm × 600mm mat creates a cleaner, more unified look.
Ready to build your setup?
Browse our curated collection of keycaps, lighting, and desk accessories.
Shop Now